Insulin Pump Case With Velstretch Belt – Alien Skulls
Some airlines will require you to notify them of your medical equipment in advance and fill in additional paperwork before you fly.
Failure to do this can, in some cases, result in passengers not being allowed to board the aircraft with their pump or CGM.
Although insulin pump manufacturers indicate that pumps can safely go through airport security systems, pump wearers may request a visual inspection rather than walking through the metal detector or being hand-wanded.
Advise the screener that the insulin pump cannot be removed because it is connected to a catheter inserted under your skin.
Let screeners know if you are experiencing low blood sugar and are in need of medical assistance.
Insulin pumps and supplies must be accompanied by insulin with a label clearly identifying the medication.
You should also speak to your diabetes team – should you need to remove your pump for any reason, they can provide you with any extra equipment such as insulin pens and help plan your doses throughout your journey.
Caution around insulin pumps and CGM onboard aircraft is due to wireless functionality, which may interfere with aircraft communication and navigation systems.
If your pump or CGM cannot function without a wireless signal, then you may need to be prepared to remove your CGM and pump and administer insulin with an insulin pen for the journey.
You would also need to test your blood glucose levels manually with a standard blood glucose meter.
Also dont forget to pack extra insulin pump supplies (cleaning agents batteries, plastic tubing, infusion kit, catheter, and needles).
Updating Your Time & Date Of Insulin Pump When Travelling
Setting the correct time and date in your pump is necessary for accurate basal insulin delivery and allows you to keep an accurate record of your insulin delivery and other pump functions. You can select a 12-hour or 24-hour clock. You must reset the time and date if you receive a CHECK SETTINGS alarm or you clear your settings (Clear Settings function).
Device: MiniMed® 530G (551/751), MiniMed® Paradigm RevelTM (523/723), MiniMed Paradigm® 522/722, GGuardian® REAL-Time System, MiniMed Paradigm ® 515/715
Important: The time on your insulin pump/CGM monitor determines your personal settings (including basal and bolus rates) so make sure it is always up to date.
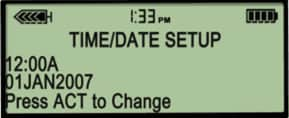
<>Go to the TIME/DATE SETUP Screen<>
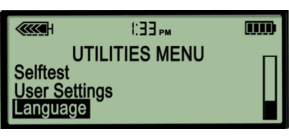
Main Menu > Utilities > Time/Date<>
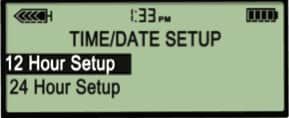
 <>Select 12 Hour Setup or 24 Hour Setup and press ACT.
<>Press ACT again to change the settings.
<>Change each of the settings as follows:
<>Change the hour. Press ACT
For 12-hour setups, press the UP or DOWN arrows until the correct AM or PM appears.
<>Change the minutes. Press ACT.
<>Change the year. Press ACT.
<>Change the month. Press ACT.
<>Change the day. Press ACT.
<>The TIME SET AT screen will show the settings that you programmed.
<>Press ACT and exit the menus.
Important: After you have programmed the new time, always double check your settings (especially that the AM/PM setting is correct).
Changing the Language on your Insulin Pump
Device: MiniMed® 530G (551/751), MiniMed® Paradigm RevelTM (523/723), MiniMed Paradigm® 522/722, Guardian® REAL-Time System, MiniMed Paradigm ® 515/715
Changing the Language
The language shown on the pump screens can be changed. Some languages may not be available on all pumps. Before you can select another language, you need to set the time using the English screens.
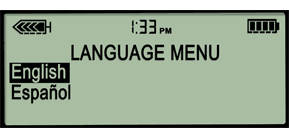
<>Go to the LANGUAGE MENU screen
Main Menu > Utilities > Language
 <>Select your language, then press ACT.

<>The language setting is now changed. Exit the menus.
If you have any information,questions, or feedback you would like to include in this post.
Please email momo19@diabetessupportsite.com or leave your comments below.
